You’re either here because, like me, you’ve beaten the game once and now want to go back around and try the optional challenges. Or you’ve discovered the Chalice Dungeons a few hours in and want to know if it’s worth it. You might be here because you like seeing how badly these games go for people with no skill. You meanie.
As with the rest of this guide, I’m here to explain how I, an unskilled gamer, made it through the Chalice Dungeons. Specifically, I completed all the Dungeons that lead to that PlayStation Trophy. That means that the ‘git gudders’ will say that there’s so many other hard bosses I didn’t beat, but I did what is required to claim glory.
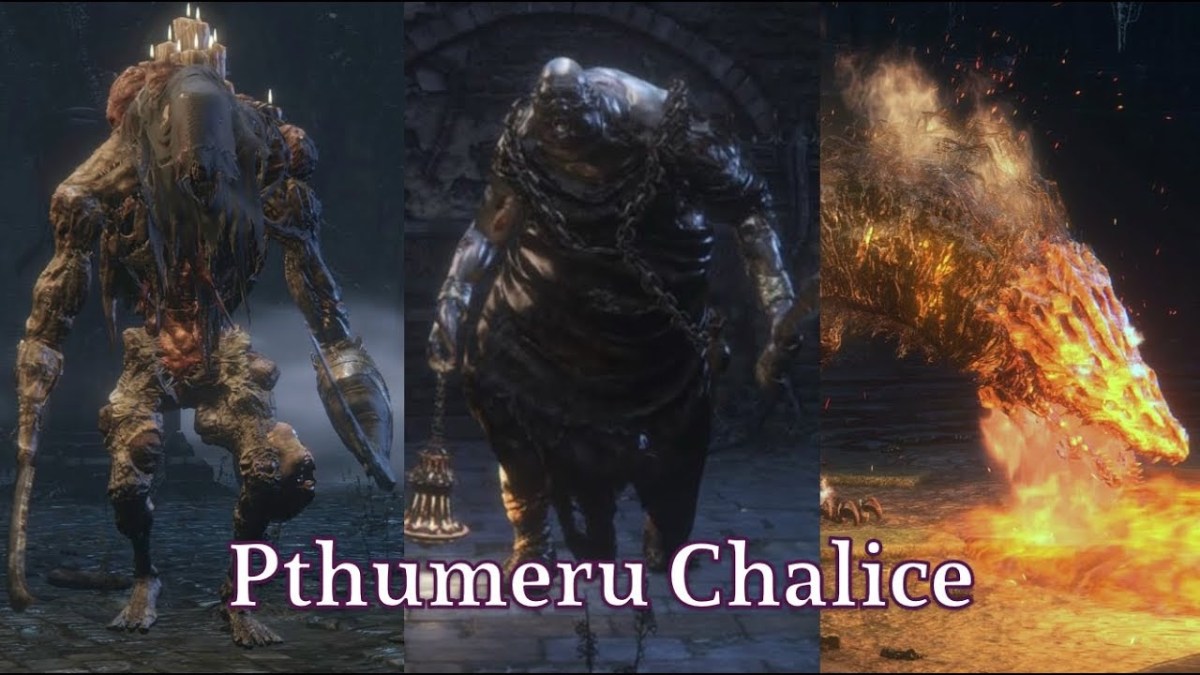
Below is how I tumbled and panicked through the three bosses of the first Dungeon. If I can do it, so can you.
Undead Giant
Preparation
None required really. If you are managing the game outside the dungeon at the level you are on, then you don’t need to be stronger than you are for these bosses. This Labyrinth, and also the next, are much more sensible challenges than the rest of the Chalice Dungeons.
Tactics
This is a Stand-In-Front scenario. Getting behind Undead Giant is possible but he likes to turn as he slams, so doing so isn’t a safe bet. It’s better to learn his forward swings by facing him, and when he has a pause, go in a swipe, then step back.
Now, if you watch my video, you can see I was being lazy with avoiding damage, even cheekily winding up attacks. You can do this to, if you’re impatient. His attacks are hurful, but slow, so at a certain point you can afford to let him hit you to get a second/big swing off, then retreat. If you don’t like this, let him swing until tired, hit him once, back away, repeat.
And target his knee, if you can. When that pustule pops, it takes health with it. Don’t worry too much; if you’re in front, you’ll end up hitting it by accident, and hitting it later in the fight can be arguably more helpful.
Watch Out For
The jump attack. I didn’t fight him enough to learn what distance triggers this, but you need to be ready to roll forward if you see that leap.
The spin attack. If you do end up behind him, that twirl he does hits very hard and his next move won’t be far behind. Be ready to roll away and let him turn to face you.
In Other Words
- Let him swing at you as you back up.
- Hit him in the breaks.
- If you’re behind, move away.
- Be careful of his jump.
Merciless Watchers and Chieftain
Preparation
If you’re new to the Chalice Dungeons, you will get very used to this shape of room, but if not, you might want to have a run around and check things out on your first playthrough.
Bring anything that will up your damage output. Just so that you can thin the crowd early on.
Tactics
Two health bars are obviously better than three, so it’s clear we want to focus our efforts, but doing that too much runs the risk of being overrun. The main thing you’re going to do is bait them. Go in and off to one side, when they are all coming down the stairs together, backpedal to the opposite side ready to go upstairs.
Doing this spreads them out, and makes the chieftain ineffectual with his blunderbuss. Let the front Watcher take a swing, dodge back then respond with your own swing. Move back quick in case Watcher 2 takes a swing. If they switch rolls and you find yourself hitting the other Watcher, keep going, don’t try and chase the lower health bar.
When they are gone, go for the Chieftan. When I rushed him he didn’t think to take his club out, which made the fight with him very easy.
Watch Out For
These guys don’t do anything special. Just be mindful of their reach, and where the other two are.
In Other Words
- Lead the Watchers on a merry chase.
- Rush the Chieftan afterwards.
Watcher of the Old Lords
Preparation
Everything you see or read online should be taken with pinch of salt. I’m about to explain what worked for me here, but it was the only time I fought him and it was a hot hot mess (pun intended). However… it did work, so its at least worth sharing what I did.
The main thing here is to make sure your pocket of healing is full.
I also tried out a summon, which I don’t normally do. I don’t recommend it. I’ve had one boss fight where the distraction outweighed the extra boss health. This was not it.
Tactics
You are aiming for the back legs. More often than not, I ended up by the right back leg (left facing them).
The main attack is a quiver leading into a vicious swinging bite. The bite starts high, so (with a bit of practice), you can dodge forwards and be under and past the bite at the critter’s mid-section. Swing for that back leg.
The front legs are fine too by the way. You’re just more likely to be at the back when you dodge. Whichever leg you hit will eventually give out with a spew of lava. When that happens, get one extra swing and then back up. You can see me in the video get greedy, then get sent reeling as he does a burst of flame as revenge.
When he starts vomiting lava, you want to get to those back legs again. If you get there quick, he’s going to let you take a couple of free swings.
If you’re swinging wildly, like I did, you might knock the head. After a few knocks, you might see him fully stagger forwards. This is supposed to be a moment for a Visceral attack, but I couldn’t get it to connect, and felt much safer to use the time to get in more leg strikes.
Watch Out For
Soooo much to watch out for.
Instead of biting, he may bark fire at you. If you’ve already decided to dodge under a bite, this will hit you sadly. But there’s a short pause after he’s finished that will allow you a heal.
If you’ve had to put some distance in, for a big heal or some such, he might do his leap attack. You need to dodge left or right fast. I didn’t make it (though I did with a later carbon copy of this mutt) so be ready to heal at least once. Luckily there’s a pause after this too.
If you see little swirls form around him and he charges up, run-dodge out of his radius. He liked to do a leap attack directly after this too. This was where I was most at risk.
To put it another way, you’re looking to hit his back legs, but there’s a lot of mean moves that don’t let you and are hard to avoid. So have a full tank of healing. This is a messy war of attrition.
In Other Words
- Dodge forward under his chomps.
- Swing for the legs, step back after he flinches.
- Be prepared to heal through a lot of mean fire attacks to get to the first two points.
It’s worth pointing out, that the next time I met a Watchdog, I used a different tactic. That’s because he’s so much tougher, and a slower, steadier approach was needed. It would work here too, but might be unnecessary. When I write that post, I may add a link in here so you can see both options.
Keep on Hunting!
Want help with other Bloodborne bosses? Click Here!
